Logo Placement on Umbrella Panels: A Buyer’s Spec Guide
Artwork delays usually start with a vague panel mark: “put the logo on one side” is not enough for sampling, printing, or inspection. On our Songxia factory floor, we check panel grain, seam pull, print stretch, and folding lines before approving a layout, because a logo that looks centered on a flat dieline can shift once the umbrella is sewn and tensioned. This umbrella logo placement guide starts with the specs buyers should lock before production.
Understand the Umbrella Panel Layout First
Start the umbrella logo placement guide with the rib count, because the panel geometry controls everything that follows. Most rain umbrellas are 8K: eight ribs, eight triangular branded umbrella panels, and one practical print zone per panel. A standard 23" straight umbrella usually gives a safer custom umbrella print area of roughly 180–220 mm wide by 120–160 mm high on each panel, depending on arc, seam width, and whether the canopy is 190T pongee, 210T pongee, POE, PVC, or EVA. Larger golf sizes, especially 27" and 30", can open that zone by 20–40%, but the triangle still narrows sharply toward the top cap. Premium 10K and 16K layouts look stronger and smoother, but each panel becomes narrower, so wide horizontal logos may need to shrink, stack, or move lower on the panel. I always tell buyers not to approve artwork from a flat rectangle mockup; approve it on the actual panel template.
Center alignment means centering the logo inside the printable triangle, not centering it between the canopy tip and runner like a poster. The top of the artwork should stay below the reinforced cap area, and the left and right edges need seam allowance because sewing can eat 8–12 mm per side after cutting, folding, and lockstitching. For screen printing, we normally keep fine text at least 15 mm away from seams to avoid ink buildup on the raised stitch line; for heat transfer or sublimation, the risk is distortion when the 190T or 210T fabric is tensioned over the ribs. Logo umbrella artwork specs should call out panel number, print size in millimeters, print position from the lower hem, color system, and whether the logo is read from the outside while the umbrella is open. Our standard practice at ZheBrella is to mark the lower hem line, center rib line, and no-print seam zone on the approval template.
One-panel branding is the safest promotional umbrella design choice when the buyer wants a clean corporate logo, fast production, and fewer AQL 2.5 inspection disputes; it also keeps costs controlled for MOQ orders under tight lead times. Alternating-panel branding, usually panels 1-3-5-7 on an 8K canopy, gives better visibility in crowds and event photos without printing every panel, but it requires consistent panel orientation during sewing or the pattern will rotate out of sequence. Multi-panel branding works for retail graphics, sports sponsors, and step-and-repeat logos, yet it should be specified as either repeated independent logos or a continuous wrap. A continuous wrap across seams is the hardest: cutting tolerance, fabric stretch, and rib tension can shift the image 3–8 mm at each join. For that reason, an umbrella logo placement guide should warn buyers that cross-seam artwork needs a production sample, not just a digital proof.
Choose Print Areas by Umbrella Type
Compact folding umbrellas give the least forgiving print area, so keep the logo small, centered, and away from rib seams. On a 21" or 23" 3-fold frame, the visible panel looks generous when the canopy is flat, but after sewing and tensioning, the safe custom umbrella print area is usually only 120–160 mm wide by 70–100 mm high per panel. A heat-transfer logo can hold finer detail than screen print on 190T pongee, but the curved panel still distorts long horizontal artwork. I usually tell buyers not to run text close to the lower hem or near the top cap, because the fabric angle changes sharply there. For promotional umbrella design, one-panel printing is the budget choice; two opposite panels improve visibility without making registration a nightmare. If the umbrella is auto-open-close, remember the folded canopy stacks tightly, so thick rubber transfers can leave pressure marks during packing.
Straight umbrellas are easier because a 23" or 27" canopy has deeper panels and less aggressive folding memory. For standard 8K steel or fiberglass rib models, a practical logo umbrella artwork spec is 180–220 mm wide by 110–140 mm high on one panel, depending on the arc and seam allowance. The cleanest placement is the lower-middle of the panel, about 60–90 mm above the hem, where the panel is flatter and less interrupted by stretch. Golf umbrellas, especially 30" or 32" models with 8K or 16K frames, allow much larger branding: 250–320 mm wide is realistic, and oversized single-color screen print can work well on 190T or 210T pongee. But bigger is not always better. If artwork crosses too close to stitching, the squeegee pressure changes and ink density becomes uneven, especially with white ink on navy, black, or red fabric.
Double-canopy windproof umbrellas need a stricter umbrella logo placement guide because vents reduce usable space. On vented golf models rated to survive 50+ mph in a wind tunnel, the upper canopy and lower canopy overlap, and the vent seam can cut through the area a buyer assumes is printable. Printing over the vent is bad practice: it can glue fabric layers together with transfer adhesive, block airflow, or crack when the canopy flexes. Our standard practice at ZheBrella is to mark branded umbrella panels after the vent construction is confirmed, not from a generic flat template. For these models, place logos on the lower canopy panels below the vent seam, usually keeping 30–40 mm clearance from stitching and rib pockets. If the buyer wants maximum exposure, use alternating panels rather than one oversized graphic. This keeps the umbrella balanced visually and avoids print defects caused by raised seams, reinforced tips, and double-layer fabric movement during curing.
Match Artwork to Fabric and Print Method
Fabric choice changes the real print result more than many buyers expect, so an umbrella logo placement guide should not treat 190T pongee and 210T pongee as interchangeable. 190T pongee is lighter, slightly more open in weave, and common on 21" and 23" promotional umbrellas where cost and MOQ control the spec. It accepts screen print well for solid 1–3 color logos, but very small text under 6 pt can soften after the canopy is stretched over 8K steel or fiberglass ribs. 210T pongee has a denser hand and smoother face, so it holds sharper edges for branded umbrella panels, especially on 27" and 30" golf umbrellas where the custom umbrella print area is larger and viewers stand farther back. For either fabric, darker canopy colors need either an underbase or adjusted ink opacity; otherwise white, yellow, and light gray logos will look dull after curing and final AQL 2.5 inspection.
Screen printing is still the most stable method for repeat corporate logos, but it is not the best answer for every promotional umbrella design. On 190T pongee, screen print gives clean coverage for blocks, icons, and simple wordmarks, with good wash and rub resistance after proper curing. On 210T pongee, the same screen can carry a little more detail, but registration tolerance still matters when printing across multiple panels or near seams. Heat transfer is better for full-color marks, small sponsor logos, and artwork with tight edges, but the film hand can be noticeable on lightweight 190T if the transfer area is large. Digital print works best when gradients, photos, or many colors are required, yet buyers should expect color shift between monitor proof, fabric proof, and bulk panels because pongee absorbs and reflects ink differently than coated paper.
Fine lines, gradients, metallic inks, and high-contrast logos should always be proofed before bulk production; this is where logo umbrella artwork specs prevent expensive arguments. A 0.3 mm line that looks acceptable in a PDF can disappear on navy 190T pongee after screen exposure, while metallic silver may lose brightness if the ink sits too thin or the canopy has a water-repellent finish. Gradients need digital or sublimation-style handling, not a rushed screen halftone, unless the buyer accepts visible dots at close range. Our standard practice at ZheBrella is to request vector artwork, Pantone references, target panel position, and finished logo size before making a strike-off. For a practical umbrella logo placement guide, I tell buyers to approve one physical sample under daylight, not only a JPG proof, especially when printing on alternating panels, double-canopy vented umbrellas, or UPF 50+ coated fabric where ink adhesion and color depth can change.
Specify Color, Tolerance, and Sample Approval
Lock the color standard before anyone cuts fabric. A proper umbrella logo placement guide should call out Pantone Solid Coated or Uncoated references, not just CMYK or RGB values pulled from a PDF. For screen printing on 190T or 210T pongee, I ask buyers to list the Pantone code, print method, logo width and height in millimeters, and whether white underbase is required. Dark navy, black, forest green, and burgundy panels usually need an underbase to keep a red, yellow, or light gray logo from looking dirty. For heat-transfer and sublimation, the artwork file should still include Pantone targets, but the buyer should understand that polyester, POE, PVC, EVA, and coated fabrics absorb or reflect color differently. UPF 50+ silver or black coatings are especially tricky because they change how the printed color reads under daylight compared with office light.
Position tolerance needs to be written like an engineering spec, not a wish. For branded umbrella panels, define the logo centerline from the panel tip, lower hem, or side seam in millimeters, then state the acceptable tolerance, usually ±3 mm for a single-panel logo and ±5 mm for multi-panel repeat printing. A common retail spec for a 23 inch, 8K auto-open umbrella might read: logo 180 mm wide x 65 mm high, centered on one panel, bottom of logo 120 mm above the hem, tolerance ±3 mm horizontal and vertical. For a 27 inch golf umbrella with double-canopy vented construction, the custom umbrella print area is larger, but seams, vents, and rib pockets still reduce the safe print zone. Never approve artwork only by looking at a flat panel mockup; curved canopy tension changes the visual spacing once the ribs are assembled.
A physical pre-production sample is the only reliable approval tool when brand color matters. At ZheBrella, our standard practice is to make a printed PP sample using the confirmed fabric, coating, rib structure, and handle color before bulk production, then hold that sample beside the approved artwork during line inspection. This matters for logo umbrella artwork specs on dark canopies, UPF 50+ coated pongee, reflective trims, and large promotional umbrella design runs where one color shift can affect thousands of pieces. The approval record should include photos, Pantone target, measured logo size, measured placement, print method, and signed tolerance acceptance. For export orders, build the PP sample into the schedule: 5 to 7 days for artwork and screen setup, 3 to 5 days for sample production, then bulk lead time after approval. If the buyer skips this step, AQL 2.5 inspection can catch defects, but it cannot redefine color expectations after production is already finished.
Inspect Branding Before Shipment
AQL 2.5 is the right inspection level for branded umbrella panels because logo defects are usually visible to the end user before they notice frame details. I set separate checkpoints for logo position tolerance, ink adhesion, color variation, print cracking, ghosting, panel orientation, and packaging mix-ups. For most orders, logo center deviation should stay within ±5 mm on a 23" or 27" stick umbrella, and closer to ±3 mm on compact 21" folding models where the custom umbrella print area is smaller. Color should be checked against a signed Pantone or physical strike-off under D65 light, not only against a phone photo. For dark 190T or 210T pongee, white underbase consistency matters; a weak underbase makes red, yellow, and royal blue drift badly after drying.
Inspection must include opening and closing the umbrella, especially auto-open and auto-open-close models. A logo can look acceptable on a flat sewing table but distort once the ribs pull fabric tension across 8K, 10K, or 16K frames. Double-canopy vented windproof umbrellas need extra attention because the upper and lower canopy layers can shift during sewing, making the logo appear angled after deployment. On heat-transfer prints, I rub-test the edge of the film and flex the panel along the rib seam to catch early lifting or cracking. On screen prints, I check for ghosting from poor jig registration and pinholes caused by uneven squeegee pressure. This is where a practical umbrella logo placement guide should go beyond artwork dimensions and define how the mark must look when the umbrella is actually in use.
Packaging inspection prevents the most expensive branding mistakes because carton labels often pass while the inner mix is wrong. Each SKU should be matched against the approved logo umbrella artwork specs, handle color, sleeve print, hangtag, barcode, and carton mark before sealing. Mixed event logos, reversed panel orientation, wrong sleeve branding, and swapped manual versus auto-open models are common when several promotional umbrella design versions run on the same line. Our standard practice at ZheBrella is to inspect finished goods by carton pull, then open sampled umbrellas fully, close them, sleeve them again, and confirm the logo still faces the intended display direction. For FOB or DDP shipments, catching these issues before loading is far cheaper than sorting 1,000 units in a warehouse after the campaign date is already fixed.
Frequently Asked Questions
What logo file should buyers send for umbrella panel printing?
Vector AI, EPS, or PDF files are preferred, with Pantone colors and logo dimensions included. Raster artwork can work for digital print, but the factory should confirm resolution at actual print size.
Can a logo cross umbrella seams?
It is possible but riskier than single-panel placement. Seam crossing needs pattern matching, tighter sewing control, and sample approval because small panel shifts can distort the artwork.
What seam clearance should we specify for umbrella panel logo printing?
For most OEM umbrella orders, keep artwork at least 15–20 mm away from stitched seams and panel edges. Larger golf umbrellas or complex multi-color logos may need 25 mm clearance to prevent distortion during sewing and tensioning.
What artwork files should a buyer send before umbrella sampling?
Send vector artwork in AI, EPS, or PDF format with Pantone color codes, target logo width and height, panel location, and print method. If the logo uses gradients or photos, provide a high-resolution raster file at 300 dpi at actual print size.
How should logo placement be checked during umbrella inspection?
Use the approved pre-production sample as the reference and measure logo size, distance from panel seams, color match, and alignment on at least AQL-selected units. Common tolerances are ±3 mm for placement and ±5% for printed logo size unless stricter limits are written in the purchase order.
Looking to Launch Your Custom Umbrella Line?
ZheBrella is a Zhejiang-based OEM/ODM umbrella manufacturer with 17 years of export experience. Free design, low MOQ from 100 pieces, windproof construction, full-color print.
Get Free Quote Now »People Also Search For
Related Articles
Minimum Logo Size Rules for Branded Compact Umbrellas
Set practical logo size, line weight, fabric, and print specs for compact umbrellas so small branding stays readable in ...
Read More »Logo Scaling on Folding and Golf Umbrellas for Brand Teams
Set practical logo sizes across folding, stick, and golf umbrellas while accounting for ribs, panels, print methods, mec...
Read More »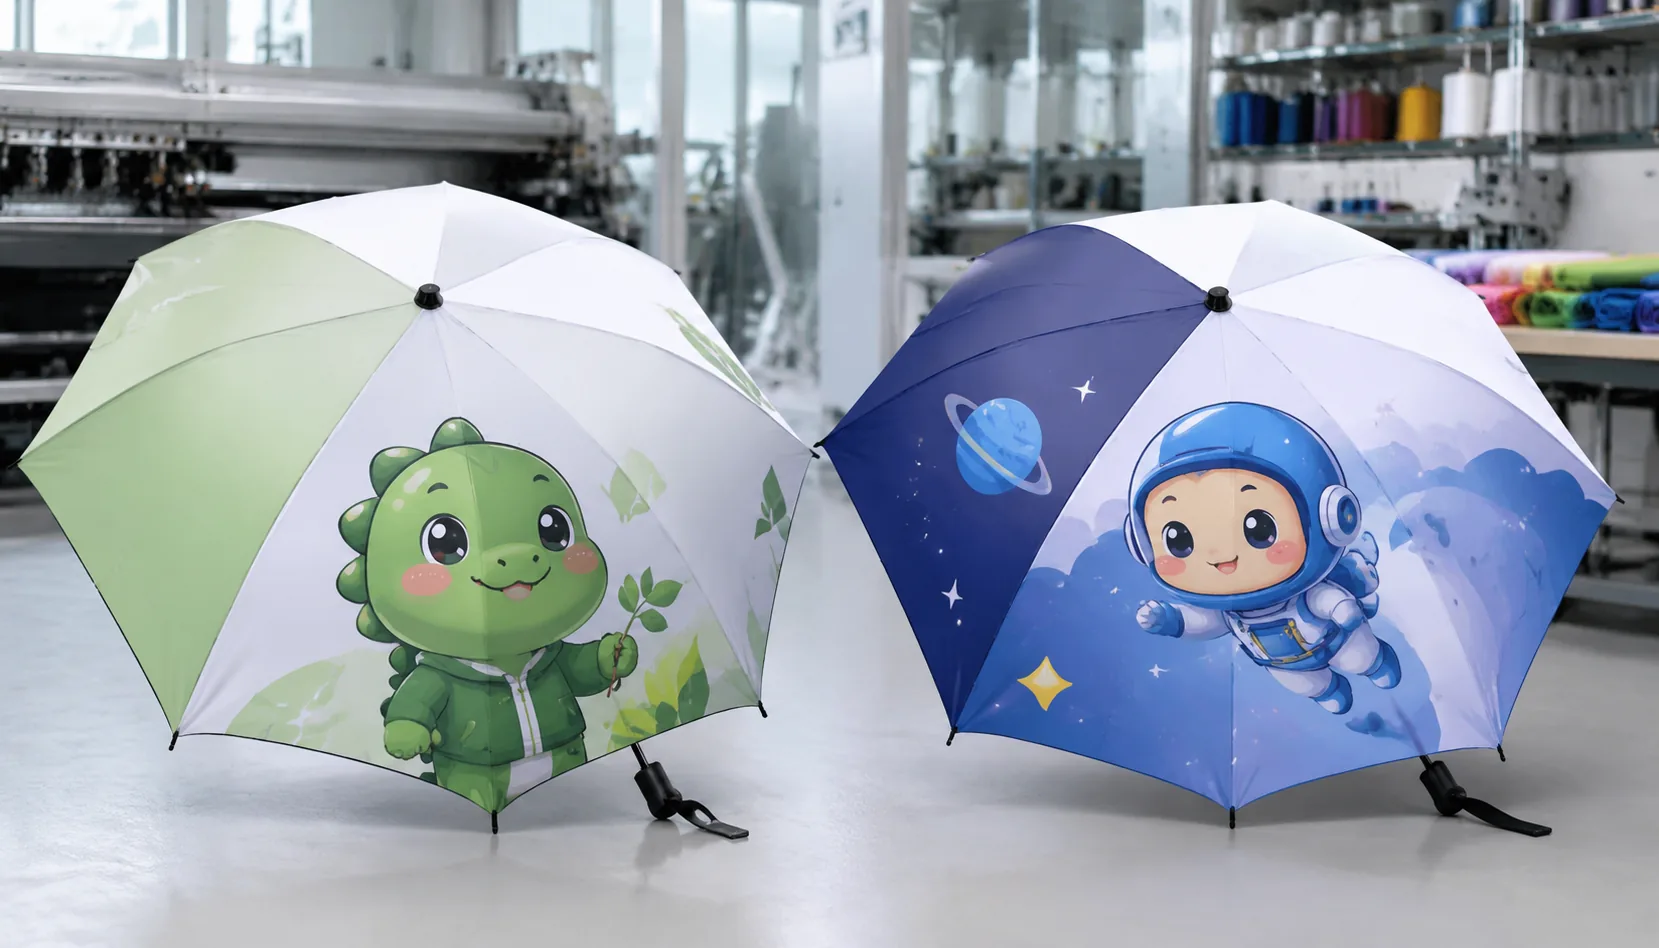
Mascot and Character Printing on Branded Umbrella Panels
Build mascot or character umbrellas with better artwork control, panel placement, fabric selection, sampling, and licens...
Read More »